Sunday, July 28, 2013

DIY: How to apply a CONCEALER???


Hey there, we meet again! Last week, I talked about concealer, different types of it (Concealer!!! Concealer!!!). I hope it was informative. I wanted to introduce the product (concealer) before showing how to use it! Thanks for all the positive responds, it just makes my day better and better. Well today, I will be guiding a bit about how to actually use it. A lot of people ignore the fact that it can be a magic product. It instantly conceals all the zits, blemishes and dark circles giving a healthy glow, but if you don’t apply it correctly it can be a total disaster. However, if you do not have any blemishes or zits or dark circles you can always skip this step. I usually use only foundation but there are times when I don’t get enough sleep, that is when I use concealer J.


Depending on your requirement pick a perfect concealer for you.
Remember!
  1.  Powder concealer : minimal coverage
  2.   Liquid concealer : minimal to medium coverage
  3.  Cream concealer : medium to maximum coverage
  4.  Stick concealer : maximum coverage


      Today, I will be showing you how to use a cream concealer. In my usual days, I am more of a foundation person, but this week I was physically unwell, so I had a lot to cover. So, I thought it would be perfect to demonstrate the process of concealing my under eye bags !!! 


Step 1: Here, I have done just the eyes, rest area is bare without any foundations or concealer. Prep your face with your favorite moisturizer or primer.


      Step 2 : Apply a layer of your favorite foundation.
      (TIP: There is no strict rule, to apply  foundation first. You can either apply concealer or foundation first ... whichever you find comfortable.)


     Step 3 :  Apply the cream concealer with your ring finger(because it is the weakest finger among all), on the highlighted part. 


     Step 4 :  Pick your blender brush and start blending in a swirling motion.


      Step 5 : Finish it off with a translucent powder to set the concealer !!! Also apply a coat of Mascara on your lower lashes.


        Voila! under eye dark circles and eye bags are gone! (Remember! concealer helps to reduce the the flaws not remove it) ...  So, practice couple of times before you actually go out! one of the best ways to find out if you are doing it right is by taking some pictures! Trust me it really helps!! I had my moments too !! ;). I hope this tutorial helped you guys! Please let me know your experience once you have tried it!!
     
   Send in your message on facebook for any beauty tips I'd be more than happy to help!

    Much Love Bipashi
Stay tuned for more blogs...

Like my Facebook Page:


Saturday, July 20, 2013

Concealer!!! Concealer!!!


Hey, Namaste!!! A big hello from Bipashi!!! I am having a super duper busy week with all the beautiful brides; I will be posting their pictures soon, just hold your horses. Well today, I’m going talk about concealer. Sowhat is a concealer? How many types of concealer are there? How is it different from foundation? When do I have to use it?  How to use it? These are very common questions that I have been asked and also were my questions when I first started using it.


Foundation and concealer are flesh-toned products which helps us to even out our skin. Concealer is highly pigmented and is mostly used in small areas to hide dark circles, blemishes, pimples, freckles, scars, birthmarks etc. whereas foundation is mostly used in large areas to even out the skin tone. However, if your skin is clean without any dark circles or pimples or blemishes you can always skip this step.


There are different types of concealer like powder concealer, liquid concealer and cream or stick concealer. Are you thinking which one is the perfect one for you???  Don’t worry I’m here for that ;)

Here are few types of concealer :

Cream Concealer

Powder Concealer

Mousse Concealer

Stick Concealer

Liquid Concealer


Before choosing the right concealer we need to decide what kind of coverage we are looking for. If you are looking for a light coverage then go for a powder or liquid concealer but if you are looking for some high coverage I would definitely recommend you to try cream or stick concealer. In my case, I have both cream n liquid concealers because I don’t have same imperfections all the time! So, to be on a safer side I bought both of them.

Finding a right shade might be hard at first, but we definitely need to find the right shade. Grab your foundation which matches your skin tone perfectly and take one or two shades lighter than that.  

·        To apply the product first we need to gather up few things like sponge, typical concealer or a blender brush or if you don’t have any of these you can always use your ring finger it works great for a beginner.
·        If you are using your finger, use your ring finger as it is the weakest finger among all and always dab the product onto your skin rather than swiping it, this helps to give a greater coverage without any streaks.
·        If you are applying just the concealer, apply it with a blender brush, it gives air-brush finish and doesn't look overly done. If the blemishes are still seen even after applying foundation, re-apply the concealer on the blemishes again and blend it well.
·        Cream and liquid concealers are easy to blend compared to the stick concealer. So to apply stick concealer blend it with a slightly damp sponge.
·        There is a misconception that lighter the concealer the better! This is so wrong! We need to get a concealer which is near to our skin tone; you definitely don’t want to look like you are wearing invisible glasses!! Lol


 Don't apply too light concealer!!

·        Try different application methods. Don't always stick with the wand or applicator that comes with a product, as it may not be right for you. Try applying with your fingers, brushes, sponges, and other items until you find the method that works best for you. I find patting my concealer on with my ring finger, this works best for me. It gives me a natural look.

Kudos for reading! I hope it helps to you all! Please feel free to leave your comments and suggestions below. Send in your message on facebook for any beauty tips i'd be more than happy to help!

(Pictures of products extracted from google)

Hugs and kisses... Bipashi
Stay tuned for more blogs...

Like my Facebook Page:

Saturday, July 13, 2013

DIY: Earthy Tone Eye look!


Hey ya’ll!!! Yes, it’s Friday again! I’m back with a blog. This week, is about evening eye make-up. Boring and dull weather of Kathmandu made me feel like camouflaging it. So, I just thought of doing some work with earthy tone shadows. This look is very wearable to any parties. I hope you all like it!!


So, before we start with the tutorial, let’s first know the anatomy of an eye in terms of make-up. 

Anatomy of  an Eye
I have used several matte and satin(more shimmer than matte but less shimmer than shimmer shadows) eye shadow.


These are the colors that I used on:

    1.     Eye lid
    2.     Crease, outer lower lash line
    3.     Outer corner
    4.     Brow bone
    5.     Lower inner lash line
    6.     Eye brow 


Step 1:

Cleanse the eye area and remove the excess oil and dirt.


Step 2: 

Apply primer/concealer/foundation to create a good base.


Step 3:

Now, apply matte brown shade (no. 1) on lid area.


Step 4: 

Then, apply the green shade (no.2) on the crease and blend it well with the blender brush.


Step 5: 


Now, apply a dark green shade (no. 3) on the outer lid corner.


Step 6: 


Blend the colors well!


Step 7: 


Apply the matte cream shadow (no. 4) on your brow bone.


Step 8: 

Using a blender brush to blend the sharp edges.


Step 9: 

Apply the same dark green shadow (no.3) on the outer lower lashes.


Step 10: 

Now, darken the brows with taupe shadow (no. 6).


Step 11: 

Line your water line with your favorite eye pencil, also add some gold (no.5) on the inner corner area to brighten your eye.


Step 12: 


Apply a coat of your favorite mascara, and apply faux lashes to give that extra ooomph!


Voila!!!! Our eye look is ready. 

Girls! I hope you all liked it! And, remember... blending is the key to any good eye look. 

Please feel free to leave your comments and suggestions below. Send in your message on facebook for any beauty tips i'd be more than happy to help!

Hugs and kisses...
Bipashi
Stay tuned for more blogs...

Like my Facebook Page:


Friday, July 5, 2013

DIY: Monsoon Special Nail tutorial!!!


Hey dear bloggers!!! I am really thankful for all those lovely comments and suggestions! I am glad that my previous blog cleared your head about “BB cream”. Well, this time I was thinking of some DIY (Do it yourself) tutorial. Monsoon season has kicked in, so I thought of a nail tutorial related to it. It is very simple, nothing fancy and the good news is no fancy nail art tools!! I bought a synthetic brush (no. 000) from art and craft store for only Nrs. 25! The tip was very flexible and easy to use! 


Trim your nails and fill it in with a nude tone nail polish to create a clear platform


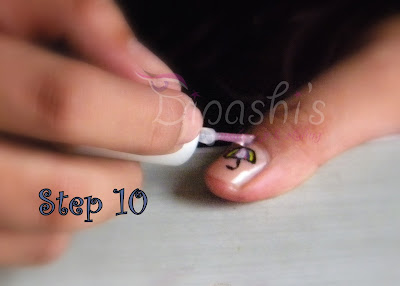
Now, here are simple 10 steps to draw an umbrella! 

Draw a semi- circle with a black nail polish using the thin synthetic brush


Then, connect the ends with a zigzag line


Draw a handle from the mid section


Now, start filling the vertical lines with your favorite colors


Finish it off with a clear top coat to even out and secure the nail polish

Happy Monsoon ladies!!


This is a simple DIY nail tutorial for monsoon. I hope you all liked it! Splash some colors this dull season! Please feel free to leave your comments and suggestions below. Send in your message on facebook for any beauty tips i'd be more than happy to help!
  

Much Love Bipashi
Stay tuned for more blogs...


Like my Facebook Page: